Ectaco JetBook Color

Pierwszy kolorowy czytnik książek w technologi E Ink- recenzja.

Rogue Trader

Epicka przygoda przestrzeni kosmicznej

Twilight Imperium 3rd Edition

Legendarna strategia planszowa w klimatach sf.

Dungeons and Dragons: Castle Ravenloft - gra planszowa

Zamkowe lochy i koszmarne monstra

Pokazywanie postów oznaczonych etykietą gry bitewne. Pokaż wszystkie posty

2 marca 2014

Kilka słów o aerografach Harder & Steenbeck

Swoją przygodę z modelarstwem zacząłem w czasach szkoły średniej. Z przyjemnością kupowałem pierwsze modele samolotów i czołgów, jednak nigdy nie byłem specjalnie zadowolony ze swoich zdolności malarskich i końcowego efektu. Po długiej przerwie, już pod koniec studiów, zainteresowałem się bardziej grami bitewnymi i malowaniem figurek. Po początkowych koszmarach, które wychodziły spod mojego pędzla, osiągnąłem poziom, przy którym przynajmniej nie wstydziłem się pokazywać swojej twórczości innym, jednak nigdy nie byłem specjalnie usatysfakcjonowany z efektów swojej pracy. Przełom dla mnie nadszedł, w chwili, gdy zacząłem nieśmiało przygodę z aerografem. 

Nie ma co ukrywać, że pierwsze zakupy odpowiedniego wyposażenia mogą wydawać się drogie. Dla mnie było to chiński aerograf kosztujący ok 120 zł i do tego malutki( teraz już wiem, że beznadziejny) kompresor. Osobno zaopatrzyłem się w kilkanaście farbek, każda po 8-10 zł, dodatki w postaci szczotek do aerografu, rozcieńczalników itp. Nagle, z dnia na dzień, część mojej pracy stała się znacznie łatwiejsza. Nakładanie podkładu szło błyskawicznie a cienka warstwa farby nagle nie zamazywała szczegółów. Podobnie było w przypadku malowania pojazdów czy broni energetycznych, wszystko szło szybko i gładko. 

Są osoby, które uważają używanie takiego sprzętu za "oszustwo", "skróty" w malowaniu. Poniekąd jest to prawda, aby osiągnąć podobne efekty pędzlem, jak przy malowaniu aerografem, trzeba posiadać spore umiejętności i poświęcić temu znacznie więcej czasu. Ja odbieram to jednak jako drzwi do nowych możliwości, do tej pory dla mnie niedostępnych.


Oczywiście nie da się w taki sposób malować każdego modelu. Taka technika jest najwygodniejsza przy większych wzorach, pojazdach typu Land Raider, Rhino i tym podobnych, sprawdza się za to jeszcze lepiej przy Tytanach (ja właśnie pracuję nad rozpoczęciem swojego Phantoma i Warhounda). Sprawa wygląda nieco bardziej skąplikowanie, przy mniejszych figurkach.

Ja nie jestem w stanie pomalować całej figurki wyłącznie aerografem, są osoby, które byłyby to w stanie zrobić, ja jednak do nich nie należę i bardzo daleko mi do takiego poziomu. Do czego więc może mi się przydać areograf przy takiej skali? Po pierwsze do nakładanie podkładu. Pozwala to na położenie cienkiej, nie zalewającej całego modelu warstwy farby. Trwa to dłużej niż zwykłym podkładem w sprayu, ale warto.

Co dalej? Możemy dość prosto wykonać preshading, czyli przykryć ciemniejszym kolorem, miejsca które będą zaciemnione na figurce, po nałożeniu właściwego koloru stworzy to ładne i naturalne przejścia barw. Dodatkowo zacząłem w ten sam sposób malować rozjaśnienia oraz cienie na figurkach, zazwyczaj pryskam jaśniejszą farbę od góry, z tej strony, z której ma padać światło i delikatniej ciemniejszą farbą z przeciwnej strony, dopiero potem zaczynam malować pędzlem.

Niestety nie ma róży bez kolców, chińskie aerografy nie należą do najwydajniejszych. W krótkim czasie zepsułem – zużyłem, aż dwa. Często się zapychały, czyszczenie było bardzo żmudne, a elementy delikatne, zwłaszcza gumowe uszczelki i głowica. Kompresor też nie zachwycał, był bardzo głośny i nagrzewał się strasznie szybko, pomimo tego, nie chciałem rezygnować z korzystania aerografu i zacząłem szukać innych rozwiązań.


Po zapoznaniu się z rozmaitymi opiniami, recenzjami i tutorialami, wybór wydawał się dość prosty, prawie każdy polecał sprzęt firmy Harder & Steenbeck. Początkowo hamowała mnie cena, za wysoka mówiąc krótko, jednak ostatecznie zdecydowałem się na zakup najtańszej opcji, czyli aerografu Harder & Steenbeck ULTRA. Jeśli jesteście ciekawi standardów firmy, sprawdźcie poniższe wideo.


Na początku nie spodziewałem się wiele, zwłaszcza, że wybrałem najtańszą dostępną opcję H&S. Jakież było moje zaskoczenie, to tak jakbym przesiadł się z Fiata na Ferrari. Doskonałe wykonanie urządzenia zachwyciło mnie, aerograf praktycznie się nie zapychał, a jeśli już do tego dochodziło to czyszczenie trwało dosłownie chwilkę i było dziecinnie łatwe.


Jak mówią apetyt rośnie w miarę jedzenia i zacząłem zastanawiać się nad zakupem droższego sprzętu, z pomocą przyszła mi firma powietrzny.com, która udostępniła mi do przetestowania trzy najpopularniejsze aerografy dostępne obecnie w ofercie firmy Harder & Steenbeck.

Najtańsza opcja to wspomniany już Harder & Steenbeck ULTRA, pomimo tego, że to najuboższy „brat” z całego rodzeństwa i tak jest znacznie lepszy niż każda chińska podróbka dostępna w sklepach internetowych czy na allegro. Wyglądem przypomina nieco droższego Evolution, jednak główną różnicą jest brak możliwości regulacji, ograniczania wielkości plamki. Zbiorniczek na farbę zmontowano na wcisk, nie na wkręt i ma pojemność 2 ml. Wyposażony jest w dyszę o wielkości 0,2 mm, natomiast całość urządzenia wykonano ze stali odpornej na korozję i rozpuszczalniki (ważne przy czyszczeniu).


Jest to narzędzie dobre dla osób zaczynających przygodę z aerografami, sprzyja temu między innymi nieco twardszy spust niż w innych modelach. Przycisk wypuszczania farby jest dość twardy w użyciu, w moim odczuciu pomocne jest to nowicjuszom, lecz może przeszkadzać bardziej doświadczonym malarzom. Wszystkie części przylegają do siebie idealnie a ich dokręcenie jest banalnie proste, dzięki temu zminimalizowano ryzyko osadzania się farby. Poniżej możecie zapoznać się ze zdjęciami oraz konstrukcją tego modelu.


Druga, droższa wersja, to Harder& Steenbeck EVOLUTION. Niech was nie odstraszy z pozoru tandetne, plastikowe żółte pudełko, jest to idealny przykład tego, by nie oceniać książki po okładce. Po otwarciu przywita nas urządzenie świetnie wykonane, którego korpus został wykonany ze stali i pokryty chromem.


Na pierwszy rzut oka jest on podobny do wersji Ultra, jednak w użyciu różni się dość znacznie. Pierwsza zauważalna zmiana, to umieszczenie na końcu aerografu kontrolki przepustowości powietrza. Pozwala to na ustalenie jak daleko możemy odchylić spust, więc kontrolujemy tym maksymalną grubość plamki farby. Strumień wyrzucanego powietrza jest płynny i pozwala na dużą kontrolę nad farbą i równomierne rozprowadzanie kolorów.

Dużą zmianą jest też czułość spustu, w tym przypadku jest on bardzo delikatny, dla niektórych może nawet za bardzo. Z jednej strony pozwala to na znacznie dokładniejszą kontrolę nad strumieniem powietrza i farby, a wraz z dyszą 0,2 mm można uzyskać zaskakująco cienkie linie, z drugiej grozi wyrzuceniem całej farby za jednym, dwoma pociągnięciami spustu.


Dostępny jest on w wersjach: zwykły Evolution oraz Evolution Silverline (różnica polega między innymi na materiale z jakiego wykonano uszczelki, dzięki temu aerograf jest odporny na rozpuszczalniki).

Harder & Steenbeck Evolution to moim zdaniem najlepsze rozwiązanie dla modelarzy, jest to solidnie wykonane urządzenie z wieloma możliwościami, łatwe w konserwacji, oferujące dużą precyzję pracy, w przystępnej cenie. Poniżej można zapoznać się z kilkoma dodatkowymi zdjęciami.


Ostatni z testowanych modeli to Harder & SteenbeckINFINITY, czyli aerograf z nutką ekstrawagancji. Infinity różni się wizualnie od wcześniej opisywanych aerografów tak mocno, jak Ultra od chińskiej podróbki. Sami możecie zobaczyć na zdjęciach, z jaką precyzją i dbałością o detale został wykonany. Całe urządzenie to nic innego jak chromowana stal, z czerwoną rękojeścią wzbogaconą złotymi elementami. Mamy wrażenie, że trzymamy w rękach pióro wykonane ze złota, a nie aerograf.

Jak zaznacza producent, dla zwiększenia precyzji, wykorzystano potrójną wewnętrzną powłokę miedzi i niklu, to natomiast uwieńczono chromowaną powierzchnią o wysokim połysku. Dzięki temu, sprzęt nie tylko ma wygadać imponująco, ale również zmniejszać ryzyko wystąpienia alergii.


Infinity charakteryzuje się również innowacyjnym uszczelnieniem igły (Longlife), które składa się z trzech odpornych na rozpuszczalniki uszczelek PTFE. Uszczelki te, według producenta, zapewniają niezawodną ochronę przed niepożądanym mieszaniem się powietrza i farby (w moim dotychczasowym doświadczeniu, jest to szczera prawda).

Dysza jak zawsze w produktach Harder & Steenbeck jest bardzo prosta do wyczyszczenia, tym razem jednak podniesiono to na jeszcze wyższy poziom. Dzięki specjalnej „otwartej”  koronce nieposiadającej kanałów powietrznych, twórcy zapobiegli osadzaniu się farby. Proste rozwiązanie a oszczędza przerw w pracy. Dokładnie widzimy, kiedy farby jest zbyt wiele i pojawia się groźba utrudnienia malowania.


Podobnie jak w wersji Evolution, Infinity posiada regulację wielkości plamki maksymalnej, jednak tym razem mechanizm nieco zmodyfikowano. Jest on dokładniejszy, wprowadzono czytelniejszą podziałkę, a dzięki opcji Quick Fix, można ustawić dwa zakresy plamki. Linie malowane tym sprzętem potrafią być naprawdę cienkie i proste. Warto tutaj wspomnieć o dodatkowej nakładce dystansowej, pozwalającej na malowanie prostych linii o stałej wielości, na gładkiej, prostej powierzchni (np. kartka).


Na koniec muszę niestety wspomnieć o minusach tego modelu. Po pierwsze cena, z tego względu polecam ten aerograf, osobom, które wiedzą co robią i szukają dobrego sprzętu na lata, jednocześnie chcąc nieco „poszpanować”. Druga „wada” to wąska dysza i głowica, niestety z tego powodu, Infinity nie nadaje się do używania wraz z większością najpopularniejszych farb do aerografów. Farby typu Vallejo Model Air okazują się zbyt gęste i nie da się nimi malować. Doskonale za to sprawdzają się farby PRO-COLOR, ich minusem jest jednak to, że są droższe od popularnej serii Vallejo.

Każdy z opisywanych aerografów Harder & Steenbeck dostępny jest w większej ilości wersji, najczęściej 2w1, co oznacza dodatkową, zazwyczaj szerszą dyszę. Często można też dokupić dodatkowe pojemniczki, uszczelki, czy zawory.

Ja osobiście bardzo polecam całą linię, spróbujcie, jeśli nie chcecie wydawać zbyt wiele, zaopatrzcie się w Harder & Steenbeck Ultra, a jeśli macie ochotę na zupełnie nową jakość, kupcie Evolution.

Dziękujemy firmie Powietrzny.com za udostępnienie sprzętu oraz akcesoriów do recenzji.
Strona firmy wraz z cennikiem
Aukcje Allegro
Profil Facebook

14 września 2013

Big Fat Uncle from Scibor Monstrous Miniatires - review


Today again we will emerge ourselves in the fantastic world of Scibor Monstrous Miniatures. Lately there is a great rush of miniatures from Scibor fantasy department, one we will review today is not newest but it still deserve our attention.

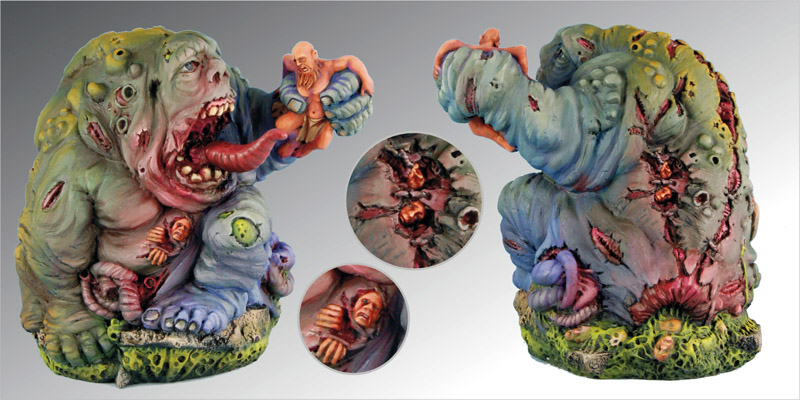
Big Fat Uncle is an awesome great demon and when I say great I mean enormous, gigantic and massive. It measures over 80mm from the base to the top, over 60 mm in diameter and comes in 3 main parts, so assembly is very simple. What we get after gluing and trimming any miscasts is a very unique model that is as much beautiful sculpture work as intentionally ugly.

Demon body is heavily mutated by warped and wicked powers of Chaos. It gives an impression of sluggish behemoth covered in slime and sores. In my mind it bears resemblance to Great Unclean One and plague demons of Nurgle, off course not intently. You can easily use this miniature in every Chaos/Demon army or collection, either fantasy or science fiction in nature.

A main portion of this model is a massive body containing mutilated torso, grotesque arms and legs, mutated head and really disturbing back. From the top, its head is low almost at the level of shoulders and its open mouth reach as far as to the middle of the chest. In the wide gap we can clearly see rows of discussing teeth and meaty inside of the demons mouth.


Above the mouth are oversized nostrils and sunken eyes with large wrinkles under it. When we look on its face we can fell a very really unease. T make matters more horrible head of the demon has one additional element that is separate, a big, curly, long and fat larva like tongue. You can almost see a toxic or corrosive saliva dripping from it. In short its head is wonderfully ugly.

When we take a closer look to a demon torso we can clearly see a disease, gluttony, mutations and chaos at work. Its fat and muscles are warped and oversized, its whole outline looks like a giant blob. From the shores and open wound a fluids are oozing, meet and intestines are pricing the sick layer of skin and coming open, and from multiples gaps in demons body human hands and heads are visible trying to reach out too free themselves or grab someone who will soon share their damned fate.


Its back is in similar state of decay but an upper part of its spine is clearly protruding from beneath rooting flesh. As this isn’t enough at the lower end of demon back there is something like… a big anus with fluids and partly dissolved human parts leaking from it, truly sickening sight.

Big Fat Uncle legs and arms are also fat and decayed and are mostly closely tight to demon body, We can see crocked toenails and fingernails, one leg is almost totally invisible under the mas of oversized body. Left hand is last part of this miniature and it has to be glued to the rest of the demons body. 

Scibor sculptured it in the process of gipping and squishing a life from some poor old human soul. What is cool is that in my opinion that person can be easily converted with parts form Warhammer (exchange of head and arms) to get more Battle of 40k experience. Either way on that pour persons face we can see a look of true despair and fear of someone that know that there are worse fate than simply death.


The whole Big Fat Uncle set is amazing in its details, seize and deliberate ugliness. In my opinion it is a really unique miniature and good challenge for yours painting skills. We got loot of surface, different “materials”(skin, bones, muscles, humans and other… demonic “stuff”). It  is not cheap model, but in my opinion it is totally worth the money.  Simply amazing.


25 lipca 2013

Scibor Monstrous Miniatures - Rene's Elven Bases Review

Lately there are lots of activities at Scibor Monstrous Miniatures. I think it’s almost like a bee or ants hive there. There are a lot of new lines of products, new paint jobs galleries and tons more of good stuff, and among that miniatures' treasure trove there are  accessories inspired by Elven motives, created by Rene's.

Rene’s minis are unique and distinctive in their style. I’ve got a chance to lay my eyes and hands on one set of small rectangular bases and one bigger round base. Off course that’s not all of Rene’s works, currently you can find elven products in multiple departments of Scibor’s store, including Bases, Decorated Plates, Basing Kits, Battlefield Terrain and more.

For me Rene’s works are a real treat and in time for current editions of Warhammer Hight Elves and Warhammer 40.000 Eldar armies. If you are a collector of Elven armies those battle bases (and most of Rene’s accessories) will fit neatly in your army plan.

The moment I’ve got my hands on Elven Skylight Mirror square 20mm bases I knew I was going to love them. You can see how much attention was paid to small details such as runes and elven patterns carved on the surface of each base. Such detailed work really helps to make them more convincing as “relics” and particularly pleasing for collectors' taste (and the price is not high, its only five euros).


You can see that at some point in the past those base surfaces used to be flat and highly decorated or engraved. In time erosion or environment and other external forces destroyed those beautiful patterns and left them shattered and in ruins as you can see them now. Still you can see the glamour behind that broken, ancient stones.

Most of designs that adorn Elven Skylight Mirror square 20mm bases are reoccurring themes in Rene’s works. You can find similar patterns on other bases or decorated plates. This creates a feeling of unity, one common and shared culture. Those accessories fit and complement each other perfectly. 

Among the shattered reliefs, lines and curves a large gem protrudes here and there (something like gems or oval stones appears on two of nine bases and a smaller one on two more). Despite ornamentations and cracks in the surface those battle bases are still flat enough to easily place a miniature, which is  important. I’ve often seen lots of really cool-looking bases, only to later determine that I have no easy way of putting my  model on top of it. 

The second product I’ve acquired is SF Elven 60mm round base (to be exact SF Elven 60mm round baseBREL0116) and that’s a real beauty. While previously described bases are flat and square-shaped, this product has a round shape. Reliefs and damaged statue parts protrude and extend in all directions, making it not a simple battle base, but a little diorama.


SF Elven 60mm round base has three distinctive levels, the first of which is the biggest flat surface, the easiest place for gluing miniatures, the second one is slightly higher, cracked and rounded elevation. This part of the base is very elaborate and it bears markings of passage of time. It is uneven, but still flat enough to put a  model on it. The Third level is the highest, the most visually significant part of this battle base, it has form of a huge head of a destroyed elven like sculpture.

The Partially degraded visage of the noble elf with a sharp and long helmet is sad and tranquil, its eyes are closed like ina millennia-long slumber. This is the highest point of the base and can be used for positioning of particularly dynamically-posed character or a flying miniature (at the top end of the stone helmet). Adding to all that is the earth and small stones that cover parts of the Elven base. Thanks to that you do not have to glue sand or other stuff to make earth/dirt effect, it’s already here.


It is a really  good looking battle base and it has been created with attention to small details, which helps to distinguish it from other accessories and models. As for quality, it is as always very good. I think there are some miscasts,At the bottom parts of the stone head  but it’s really hard to determine if it is an error or a deliberate attempt of recalling an eroded stone surface.


I will proudly display those accessories in my collection and I hope I will be able to get my claws on more Scibors products in the future.  


28 czerwca 2013

Basicks Boneyard battle bases set - review

I See Dead People… everywhere

As I already stated a couple of times, The Basicks company is selling lots of accessories for wargames’ fans, and my favorite are their battle bases. Today I wanted to present some of the fairly recent ones, a Boneyard set.

I've seen many morbid designs for miniatures and miniature bases, but none had so many… bones. The set’s name – Boneyard - is very adequate. Their designs are equally fascinating and dreadful, which make them really interesting. If you are painting an army of Undead, Tomb Kings, Vampire Counts or Chaos, those battle bases are ideal for you. It’s like you are watching your own Army of Darkness movie.


  The Basicks company has provided me with an almost whole set from Boneyard series, so I had a good look. There are six different designs with a diameter of 20x20 mm, 25x25 mm (for basic units), 50x50 mm, 40x40 mm (best suited for larger models - heroes and monsters), 25x50 mm (for cavalry) and finally 50x100 millimeters (for example - for chariots or catapults). All those bases are great, but the larger ones can be easily changed into dioramas.

All the bases are quite similar. Still, that’s not a flaw, that’s just the main theme. Almost every millimeter of each base is covered with bones, skulls, and ribcages, all together mashed into the earth so hard and in such quantities, that the bones have become the new ground. Models that use such terrain as a base can be quite intimidating.

All those accessories are made with high quality grey resin. Details as always are sharp and clean, even with such massive number of details: every bone and every skull is made with great attention, and every bone is perfectly visible among others. It is not a surprise, because the high level of detail, as I have found out, is characteristic to all Basicks products. It rarely happens that small errors are visible, such as small air holes in resin, or a skull eye socket not wholly empty (slight miscasts). You must also remember that it is not flat surface, so you must sometimes use greenstuff to properly adjust your miniature.


All of these drawbacks, however, are relatively small and can be easily repaired or wholly ignored. All you have to remember is that the Boneyard set bases are nice designs and can be used successfully, either for whole regiments or for a stand-alone hero (or even for a whole army if you have enough money).


Those items were provided by Basicks company for the purpose of reviewed on Sthenno web site!

3 czerwca 2013

Scibor Monstrous Miniatures - Town Guard Miniatures set review

Usually, we review more futuristic products from Scibor Monstrous Miniatures, but recently a large number of interesting fantasy miniatures have emerged. One good example is the Town Guard Miniatures Set. It is a group of twelve resin models which should appeal to most collectors. They should also be of interest to people who are playing Warhammer Fantasy Battle and collectors of Empire army.

Each of the twelve miniatures is unique and no pattern is repeated twice, which is a big advantage of those models. Because of the presence of a jester and a monk, we actually have the impression of meeting some merry gathering, not a “war band”. It immediately reminded me of of Robin Hood and Terry’s Pratchett’s Ankh Morpork town guard.

Among the twelve miniatures there are nine knights dressed in a variety of ways. Most often we see the quilted long armor or a quilted tunic, long coats of chainmail, and even ordinary clothes, none of the soldiers have any form of more expensive and exclusive armor plate. The level of detail is great, and at the same time the manufacturer maintained a simple and clean style without a lot of unnecessary ornamentation.


Even the proportions and age of the individual town guards are different, so we have young and old, with facial hair and without, fat people and thin, full diversity, that’s really good job.

In those minis you can see that inspiration was rather historical reality than any kind of fantasy worlds, and for me it’s a plus. The only noticeable drawback is the air bubbles you can sometimes see in the resin (especially noticeable if any bubble is on the miniature’s face ).


From the whole Town Guard Miniatures Set the most distinguished are three models. Two of them – a monk and a jester – we already mentioned above the third is a squad leader nobleman knight. The monk reminds me of the Adventures of Roobin Hood and the character of brother Tuck. He is dressed in a hooded monk's robe (the hood is hanging loose on the back). The tip of his head is properly bald and is surrounded by a wreath of hair. There is a wooden flask hanging about his neck (probably full of alcohol).

The Jester costume is very original and complex. Buffoons and folds are everywhere. The Comical image is completed by a slim chest vest, a collar around his neck and a clownish hat with bells. The Jester is holding the drum under his left arm and happily hits it with a baton held in his other hand.


The Last figure is the nobleman, a knight I suppose, as he is the only one wearing a thicker armor made of steel plates. His face resembles a Polish XVI-XVIII century Sarmat (type of nobleman) with long mustache and distinctive hairstyle popular in those times. In addition to plate armor and parts of visible chainmail, his other characteristic equipment’s parts are a medallion and a long coat rimmed with fur. This warrior is also armed with a sword and a small shield.


Additionally, each miniature has its own unique square, runic battlebase, resembling a runic marble floor, cracked and damaged by time .  


As I saidbefore, all figures are superbly designed and very well made, Even if we find some small errors in the resin, the whole Town Guard Miniatures Set makes a very positive impression. I highly recommend this product.


13 maja 2013

Scibor Monstrous Miniatures Spartan SF Veteran - review


As far as I am concerned, until recently the most noticeable and most interesting miniatures from Scibor Monstrous Miniatures store were SF Roman Legionaries. But now there are new minis that are similar to Legionaries but are still different, based on another ancient Middle Sea civilization and brought to science fiction reality, SPAAARTAAA !


No other ancient army in history of mankind had been so glorified in popular culture as Spartan warriors, especially the 300 Spartans who died at Thermopile defending Greece against the Persian invasion.  Of course, most of what we know from movies, comic books or games is fictitious, but this does not change fact that Sparta and its soldiers were feared and admired by most ancient countries. Scibor Spartan miniatures made use that ancient heritage to the fullest.    

At the first glance the inspiration for the miniatures is apparent. Warriors’ armor and weapons bear clear resemblance to ancient Greek soldiers’ equipment. Breastplate armor is stylized to look like abdominal muscles and its lower part is covered with a robe.


Additionally, the breastplate may be adorned with a gemstone or a chain with some small icon. One other thing that is visible at that part of the armor is parchments with wax seals near the armored shoulder pads. 

Leg armor is relatively plain and simple looking, and the only engravings are those of stylized Greek letter Alpha and solar rays. Shoulder pads are also of simple design. They are smooth and one is adorned with small shield with an eagle or again Alpha letter inside. 


Their weapons bear strong resemblance to Roman Legionaries’ halberds. The core of the weapon is short and at the rear tip it is ended with small blade. At the top of the halberd there is a range weapon (similar to a bolt gun) added at the bottom of a long blade.

There is a mantle with fur falling from the back of all the Spartan miniatures, similar to those you can know from SF Celtic miniatures range. From beneath the mantle there extends a turbine that is a part of the generator that powers up the warrior’s armor. 


Every model has its own battlebase. Those bases look like more or less seriously damaged block (plate) of marble with a large Alpha letter engraved in the stone surface.

Like all Scibor’s products, Spartan SF miniatures are quite massive and bulky, and the main part of each model is created from one solid block of resin. For me that is not a problem but I know that this technique has many supporters and opponents. Those minis should satisfy all those who like Scibor Monstrous Miniatures brand. The only drawback in my opinion are slim weapons, halberds can by easily damaged or broken with little force and weapon blade felt little… flimsy.

Now go and fight for the SPACE SPARTAAAA


11 kwietnia 2013

Scibor Monstrous Miniatures - Ogre War Rhino Rider Review


In our previous reviews of Scibor Monstrous Miniatures’ products, we focused on models from the SF section. Today, we will look at something closer to the liking of fantasy fans. The Relatively small section of 28mm Ogres Army includes one of the largest and most interesting (and the most expensive) figures that I have seen at the Scibor’s store.

The Ogre War Rhino Rider is a true piece of art. Do not be fooled by it being placed in a 28mm section. This model will dwarf any other miniature in your collection (except maybe the Titans of Mech Suits). Like most Scibor’s  products, this miniature is cast in one large block of resin, so that there is little actual gluing. Despite this miniature’s size, it has ​​extremely high level of detail.

The main element of the War Ogre Rhino Rider miniature is a rider astride a mutant, lizard or dinosaur-like beast. The rider is simply beautiful in its ugliness, with his open mouth, crooked teeth, large stone armor and saddle made of tree logs laced with a cord. There is surprisingly little miscast for a figure of this size. The main model almost does not require any cleaning. The only downside are the division lines visible on the back of the rider, but I managed to smooth them away easily.


The beast itself is called the Rhino, but it is more like a rhinoceros-lizard hybryd, especially since the head is very reptilian (it reminds me a little of a t-rex). The creature's body has a lot of folds that show its tough skin. The Back of the beast , along with its neck, is covered with thick fur, while stone “lumps” or scales are visible on the monster’s whole body.

The head is a  masterpiece, with folds of skin extending around the eyes, nostrils expanded, long teeth protruding from closed mouth and five horns surrounding almost the entire head (three on top and two on the bottom). While looking at this model, I couldn’t help but wish that Mr. Scibor will create a dragon sculpture in near future.


Among the additional items we find one of the beast foot and both rider's feet, two horns, and the right Ogre’s hand holding a weapon. being a powerful warrior, the Ogre has been armed with a stone hammer, which looks impressive and intimidating.

The length of the weapon could rival the height of a Warhammer 40.000 Dreadnought. The Metal braces, holding the stone on a top of a hammer are great little details. The miniature base is large and rectangular. This time, we do not find much detail on it, only a few skulls and shattered parts of an ornamented relief, in addition to the two smooth spaces, which are needed to set the massive paws of the beast.


The Ogre War Rhino Rider is another example of excellent work of Mr. Scibor Teleszyński, a tribute both to him and to the technicians involved in the casting of his little (or not so little) work of art. It is worth noting that the recently Scibor Monstrous Miniatures added to their offer models related to World War II, thereby opening a new section in the shop, Historical Miniatures. You can buy Ogre War Rhino Rider HERE